Thursday, November 11, 2010

Soggy Seeds and Potty Training Techniques

More organic seeds arrived and I got to work starting my seeds. Instead of buying a seed starting kit, which usually run about $30, I opted to make my own.

I used some green plastic dixie cups and hot glued them to a piece of cardboard. I then placed them in disposable Renolds Wrap baking pan. If you try to make your own seed starter, make sure you get a disposable pan with a plastic lid so it simulates a greenhouse. I then made a soil mixture with some organic potting soil, nutrient rich seed starter soil, and organic fertilizer. I wet the soil before I spooned it into the cups (which turned out to be a mistake, explanation to come) and then planted the seeds about a 1/4 inch below the surface.


I planted green beans, squash, zucchini, sunflower seeds, and arugula. The green beans (below) were the first to sprout so I replanted them in a larger pot. The cat is still the number one threat to my gardening activities. She guards the potted pepper like it contains the crowned jewels and she is clearly as unmovable as a Buckingham Palace guard. She's stone cold.

After the green beans sprouted, I planted them in the pepper pot so they could grow up the cage. Green beans are climbing plants and usually get pretty tall before they sprout actual beans. Quite pleased with my progress, I waited for the other seeds to sprout. However, this never happened. With the exception of one, either zucchini or squash seed, nothing else sprouted after almost two months. It's a real beaut!
This experience taught me two valuable lessons. 1) Always label what you've planted. I forgot this vital step and as a result don't even know if my baby is a zucchini or a squash. 2) Trying to understand why my other seeds wouldn't grow, I consulted my new favorite book, Growing Stuff: An Alternative Guide to Gardening which I acquired on a recent trip to West Palm Beach (on sale for a million % off). According to Elizabeth McCorquodale (introductory chapter, "Growing, Growing, Grown") , one of the book's contributors, "seedlings hate being soggy."

Recall that I wet my soil before planting my seeds? Additionally, I did not punch holes into the bottom of the dixie cups so the seeds were basically soaked from the second I planted them until I had to throw them out. Luckily, I had only planted a few as a test run and still had a lot of seeds left to work with. I removed the dixie cups from the equation, and just punched some holes into the bottom of the disposable baking container. I made the same soil mixture but kept it dry until after I'd planted my next round of seedlings. I planted green beans, squash, and arugula this time, and labeled everything! Now I'm just waiting to see what happens. My one surviving seedling, is being babied beyond belief. I worry that it doesn't get enough sunlight on the patio and learned that normal fluorescent lights 75-120 watts works best) work as an energy efficient, inexpensive alternative to grow lights. LED lights in blue or red are also really
beneficial but I'm not quite there yet.

Finally, the pepper plant and green beans finally met their end under the relentless paw of one, Mochi cat. I thought I had done enough to safeguard against this but the following cartoon says more than I care to on the subject. I had to throw out the pepper and green beans and have now equipped my pots with miniature wire fences.

Wednesday, September 1, 2010

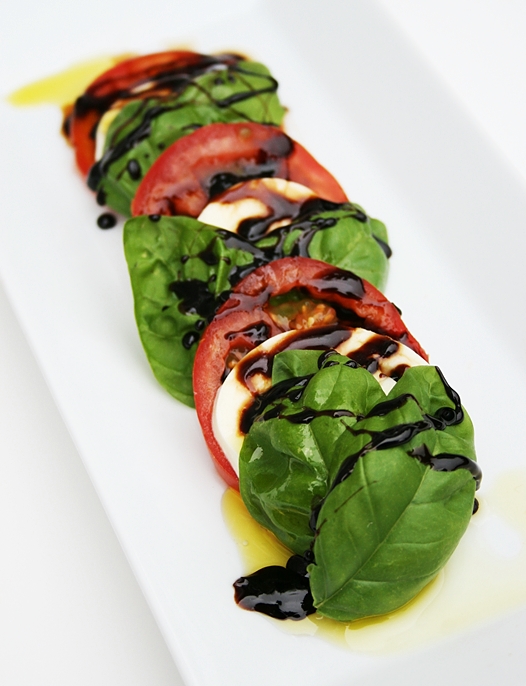
Reaping What You Sow: Caprese Recipe


One of my favorite salads is Caprese. It's really simple to make and incorporates a ton of flavors with five ingredients. The first thing I did with my tomatoes was make one of these salads.

Ingredients:

Basil
Whole Mozzarella (for slicing)
Tomatoes
Balsamic Glaze
Olive Oil

1. Slice your tomatoes, slice your mozzarella, and wash and pick your basil leaves off the stalks you cut.

2. Layer these ingredient. I like to go (from the bottom up) tomato, mozzarella, then basil.

3. Drizzle olive oil and balsamic glaze.

4. EAT!

Letting Grow and Letting Go.

After the Great Patio Debacle of 2010, the patio was freshly painted (the same shade as before) and I started work on the first of my crops. I bought a large whiskey barrel planter from Lowes (on sale of course) and planted Juliette tomatoes and strawberries together in the same pot. Tomatoes and strawberries are supposed to grow very well together so they are good plants to couple in one container. They also look pretty together because the tomato plant is tall and billowy and the strawberries cover the ground around the tomato nicely. I tucked a lattice behind the tomato plant between the table it was sitting on and the patio screen so that the plant could grow outward and still be supported.

The tomato is growing beautifully but a big fat gubby parasite killed my strawberries. It hid out under their leaves and ate away at it until I found the perp and read him the riot act.

I also planted a bell pepper plant and a hot pepper plant which were destroyed by spiders. This is what they looked like when they were beautiful.

I replanted all my herbs, basil (my favorite), rosemary, and oregano. I planted them all in the same pot with the oregano and basil at opposite ends, separated by the rosemary. Apparently, basil likes to be drowned and oregano prefers a dryer soil. By planting them this way I can easily cater to their preferences. Thank god for rosemary, my well-behaved, low maintenance child. I also found some nice Thai basil and put it in it's own pot. I'd like to get more varieties because there is a definite taste difference between the two.


Finally, I planted squash and cucumbers in a large pot together. They are good companion plants and are supposed to do well in containers. I didn't get the chance to find out because my cat almost immediately dug them up and left them dead and limp at the crime scene for me to find. They could have been so good.


Right next to the squash and cucumber is the fountain I made because I really like the sound of trickling water. It was really easy to assemble. I bought a nice pot, some rocks, and a container fountain pump (also from Lowes). After assembling the pump according to the directions, suction cupping the pump to the bottom of the pot, and adding rocks and water, I submerged a water lily in the bottom of the fountain. The pump can be a little testy but I've found that jiggling it around reinvigorates it when the spray gets limp...
ANYWAY, I learned several valuable lessons this go around.

1. Be very CAREFUL buying plants from chain stores. I was pretty impatient and just wanted to see some action on my patio so I bought some plants that were pretty far along in their growth from Lowes (I swear they are not sponsoring my blog, it's just the closest home and garden place to my apartment) and I know better. This was a mistake for a few reasons. You can't be sure the quality of the seed or the soil that your plants are in. They could also be grown from GM seeds, so you won't be able to preserve seeds from the plants you have grown for the next planting. They are also more likely to have pest stowaways that travel home with you, like my strawberries and peppers. For this reason, I have ordered some organic seeds online and plan on growing them from the proverbial ground up. Updates to come next.

2. Some plants were meant for hanging. I learned that vine-ing plants like squash that would normally spread out across the ground, do much better in hanging planters than regular containers because they can grow out much farther than a planter will allow. They also spend virtually no energy on strengthening their vines when they are hanging and all that energy goes into fruiting. That's next on my list. Once my squash sprouts, I will plant them in hanging planters. There is a great DIY Hanging Planter plan on CraftingAGreenWorld.com that I was going to make.However, I found some Topsy Turvies at target on sale for 3 dollars a piece which was cheaper than the bucket I would have needed to buy. I'm pretty skeptical of Informercial products, but I've heard they work and they are hilarious or ironic or something. Whatever.

3. Plants die and plans don't always work. Gardening teaches you to just let go when things won't grow.

Friday, July 9, 2010

Apartment living means putting your genius on hold.

I still don't have my worms. I keep saying, "next paycheck I will get my worms." It's hard to justify a $25 worm purchase when there is gas to be bought and bills to be paid. However, I recently spent $28 dollars on the Sims3 which is clearly unnecessary and shameful in light of my worm-less-ness.

We spent a good few hours recently rearranging the porch to free up optimal container gardening square footage. We were sweaty and covered in some sort of dusty sludge but very proud of the end result.

We patted ourselves on the back and sat down to absorb our accomplishment.
The next day, we came home to find a letter stuck under our door. The apartment management would be pressure washing and painting the outside of the building, including the inside of our patios, and we were required to clear the space completely to avoid any damage to our stuff. Two weeks later, they still aren't finished. Devi at the front office has estimated a finished product by Monday or Tuesday of next week, after which time we can finally get down to business. In the mean time, my plants-- which have been forced inside-- are looking rather sickly, partly because my routine was interrupted by the furniture upset and I forgot to water them for a while, and partly because they haven't been getting the proper amount of sunlight.

In the meantime, I've downloaded an APP for my iPod called "pottedgarden." It's pretty cute and perfect for a novice gardener because it provides a good amount of planting, watering, fertilization, pairing, pest control, and harvesting information about a limited number of fruits and vegetables. It makes information easily accessible if you have an iPod (an obvious problem for those people without). Yeah, there's really an APP for everything.

Seriously, I'm getting my worms very soon...I swear.

Monday, June 21, 2010

Introduction

Our apartment is located on the third floor of a large apartment complex that sits back in a "nature preserve". I'm not sure what the apartment complex itself (runoff, garbage, land use, etc) has done to the nature in our preserve but I'd be willing to bet it hasn't preserved so much as disturbed the flora and fauna. The landscaping does a pretty convincing job of disguising the fact that we are surrounded by strip-malls, interstate exit ramps, and probably the most poorly designed, traffic ridden road in Tampa bay.

I've become interested in the local food, organic food, and homesteading movements and started itching for some soil of my own to cultivate. However, my location makes this slightly impractical. I talked to a rep from our apartment complex about creating some sort of community garden but she said something about zoning and maintenance people, so I started looking for ways to grow food in containers in my apartment.

I began with a website: the very cool Windowfarming.org and a book by Maria Finn, A Little Piece of Earth: How to Grow Your Own Food In Small Spaces. The book is super accessible and even has illustrations for those of us who like a good picture to accompany our text. The important thing for me is to make the most of the limited space we have without crowding us out of our living space and to reduce our reliance on store bought produce. I'm an avid cooker so cultivating my own ingredients is an exciting next step in my quest the for ultimate fresh flava.

My first step will be to start composting. After work today, my boyfriend and I are going in search of a table top composter, the next step will be procuring a sack of live worms who will eat and poop my kitchen waste into a fabulous, nutrient rich sludge for my plants.